Plumbing is a critical system in your new custom Florida home. If you’re settling into one built by ICI Homes, do your part to make sure it stays in tiptop shape by tackling several easy plumbing maintenance tasks yourself, one of which is aerating your faucets.
If that sounds weird, keep reading. Aerating a faucet simply means cleaning a built-in filter. It’s one of the smallest components of a plumbing system, and one many new ICI Homes homeowners might not know about. But learning about faucet aerators and how to clean them is a maintenance task that can pay off in a big way down the road.
No homeowner wants to have to utter that dreaded phrase, “It’s time to call a plumber!” Here’s one way to avoid that by helping your faucets stay, “in the flow.”
Why you should aerate your faucets
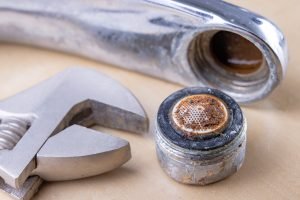
 An aerator is an integral part of all household plumbing fixtures. It’s located inside the tip of the faucet and its screen-like appearance typically controls the water flow, dispersing it evenly through holes in the screen, and regulating the amount of water used. This helps conserve a natural resource — and your water bill.
Your faucets’ aerators also serve as a screen, protecting your clean water by filtering out tiny mineral or debris particles. But eventually, corrosion, dirt and those mineral deposits can alter an aerator’s ability to perform its functions. Two sure signs of a clogged aerator are noticeable lower water pressure, or any disruption to the flow from that faucet.
Once this happens, it’s time to acquire an aerator removal tool (also known as an aerator key or wrench). These inexpensive gizmos are found at hardware and home improvement stores. Knowing what brands of faucets you have and their exact model numbers is a big help too. Share that information with a store associate or use it to simplify your search.
How to do it
If you haven’t performed this plumbing chore, don’t be bashful about asking for assistance at the store. Also read any directions that might accompany the tool’s packaging.
Once you’re ready, insert the aerator removal tool under the faucet opening and unscrew the aerator from the faucet. You just did the hard part!
Rinse the aerator. If you spot mineral deposits or pesky debris in it, use a fingertip to gently dislodge the gunk. Alternately, try a soft-bristled toothbrush or small cloth. When the aerator is completely clean, rinse it well again.
To replace it, use the aerator removal tool to screw the aerator back in the faucet. Important tip: you can prevent future clogs by cleaning your faucets’ aerators twice each year. It’s a simple weekend task that can keep some of your most important plumbing fixtures in great working order.
For more helpful tips, take a look at the rest of our Homeowner Maintenance series.
Ready to find the home of your dreams? Talk with Florida’s Custom Home Builder, ICI Homes.


